To-dos - Creating and Editing
To-Dos are tasks committed to during Weekly Meetings to ensure accountability and progress. They are typically seven-day action items that should be completed before the next Weekly Meeting.
The goal is to complete at least 90% of To-Dos each week, as these represent the most important action items for moving priorities forward.
Creating To-Dos in Better Bloom
In Better Bloom, you can create To-dos from multiple locations:
- From a meeting
- From the meeting workspace
- Using the “+” button at the top right of the page
Adding a To-Do from a Meeting
- Click Meetings from the left-side navigation bar.
- Click the name of the meeting where the To-do will be added.
- Click the To-dos page.
- Use the Create a Quick To-do bar at the top, type your To-do, and hit Enter to quickly add it.
Adding a To-do from the Meeting Workspace
- Click Workspace next to "Meeting."
- Click the three dots in the top right of the To-Do tile to create a new To-do and add details.
- Use the Create a Quick To-Do bar, type your To-Do, and hit Enter.
Adding a To-do Using the “+” Button
- Click the big "+" button at the top right of the page.
- Click To-do
- Enter the To-Do title.
- Select the Assigned Owner(s).
- Select the Meeting or choose your personal To-Do list.
- Add details, then click Save at the bottom right.
Important: The “+” button is available throughout the software, allowing you to quickly create To-Dos from anywhere.
Creating To-dos from the Legacy version of Bloom Growth
Creating a To-do during a meeting
There is a New To-do button in the meeting itself just under the menu bar at the top that allows you to assign the To-do to any attendee of your Weekly Meeting.
You can even assign a To-do to multiple people (not a shared To-do; each user will get their own To-do).
Important:
For Metrics, Goals, Headlines, and Issues, towards the right side of each of these items is a checkbox, these are the Context-Aware To-do buttons and will include information about the item inside the newly created To-do.
Creating a To-do Outside of a meeting
- You can view all of the current Weekly Meeting content through the Edit Meeting section.
- Click Meetings in the top menu bar
- Click Edit Meeting on the gear icon button to the right of your meeting
- Click To-dos on the left to view/edit/archive active To-dos
- Add new To-dos one by one by clicking the blue + at the bottom right, fill in the basic information to create the To-do, and click Save.
- If you have a list of To-dos, you can upload them all at once instead of adding them individually. To upload your To-dos all at once, click on the Upload To-dos button at the top right corner of the section:
- If you have a file with the To-do List you can upload it by clicking on where it says ‘No File chosen’, selecting your file, clicking on Submit, and following the instructions.
- You can also use our template, click on the green button that says ‘Download Template’. Fill the template with the information you want to upload to your Bloom Growth account and save the changes you made to the file (Save the file in CSV format). Then, click on where it says ‘No File chosen’, select the file, click on Submit, and follow the instructions.
Editing/Reassigning a To-do
Reassigning a To-do can only occur during a live meeting
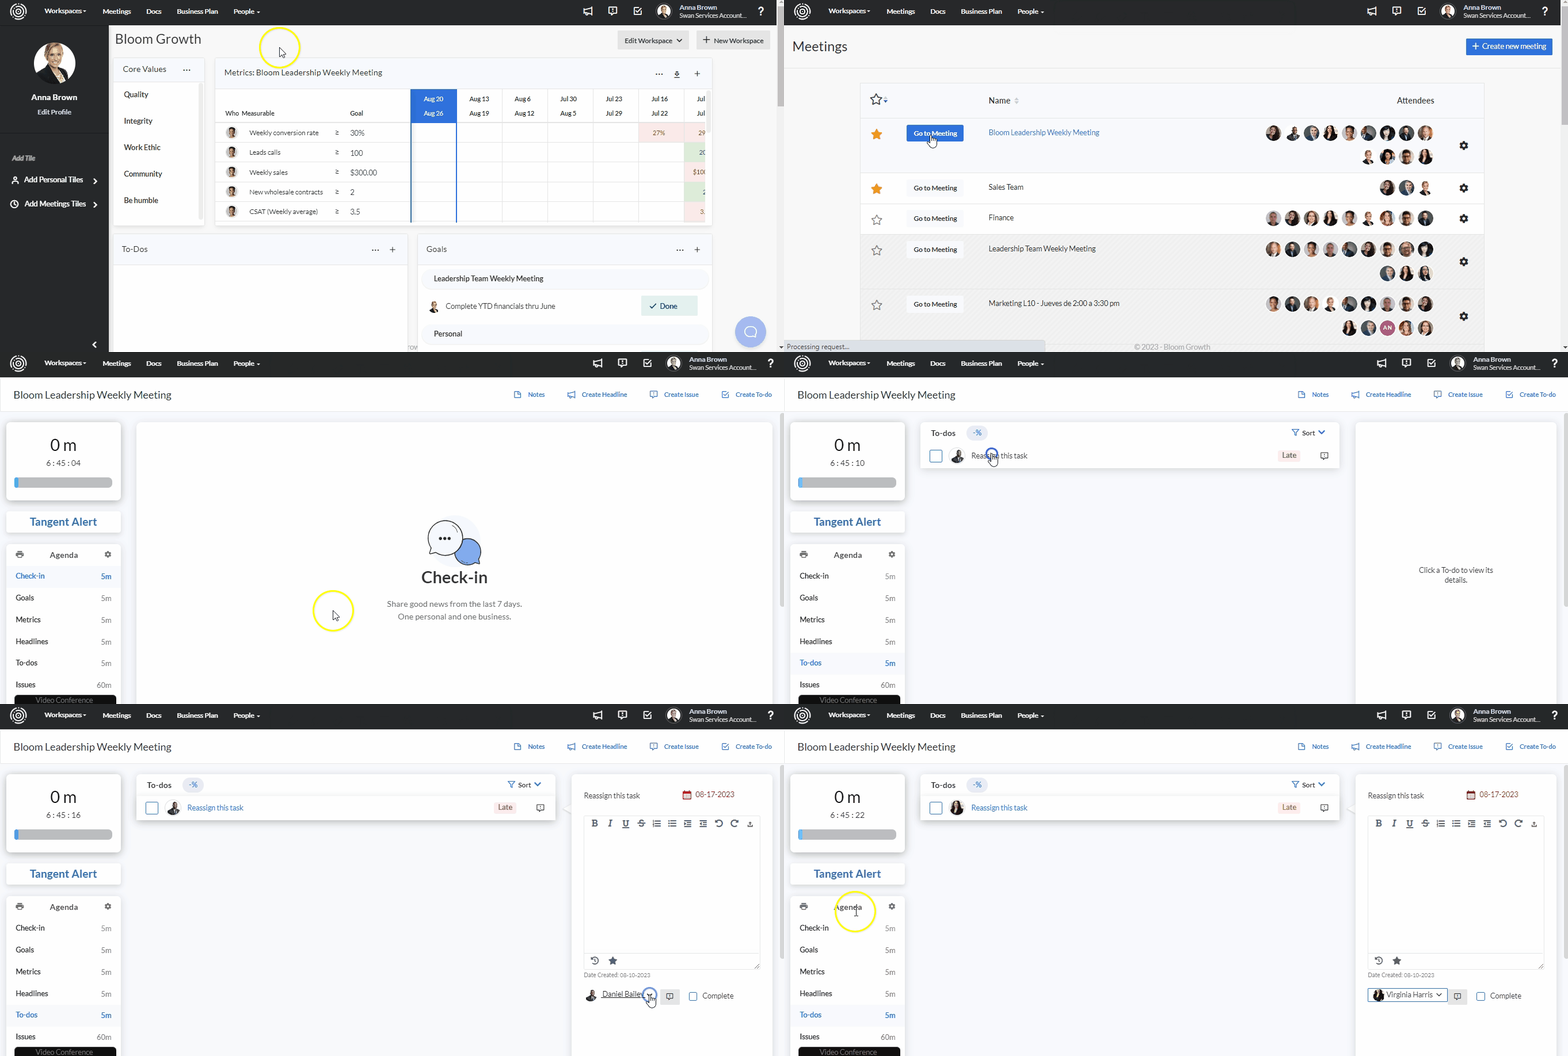
To reassign a To-do please follow the instructions below:
- Click Meetings at the top of the workspace
- Click Go to Meeting
- Click Start the Meeting as a Leader.
- Click the To-do List agenda page on the left
- Click on the To-do title
- Click on the current owner's name at the bottom right next to "Assigned to", in the side window that appears on the right
- Choose a new owner from the list of attendees
- Your change is updated immediately

Edit the To-do Title, Notes, Due Date, and Location
From the Workspace
Click on the To-do in the tile on your Workspace and use the pop-up window to:
- Update a To-do title
- Edit details, and upload files
- Update the due date by clicking on the calendar.
- Change which meeting a To-do appears by using the "Attach to Meeting(s)" drop-down to select a new meeting or your individual To-do list
- Mark as complete by selecting "Yes" under the Complete section.
- Click Save when done editing
From the Edit Meeting Section
- Click Meetings in the top menu bar
- Click on the Edit Meeting button to the right of your meeting
- Click To-dos on the left
- Click the To-do title to bring up the pop-up window
- Click Save when done editing
During a Live Meeting
- Click the To-do List agenda page on the left
- Click the To-do title
- Use the panel on the right to update the title (at top), notes and attachments, change owner, and the due date.
- Hitting the Complete check box if the To-do is complete.