Most Frequently Asked Questions
A user receives the following message when accepting their email invite: "An error occurred"
Emails can only be registered once. If a registered user's profile was deleted, a new profile with the same email will not be able to be used. The original user profile needs to be restored. See this article for additional details: User Management - Add, Delete, and Restore
Restore a deleted user:
If you already have registered an email on Bloom Growth, and you are sent an invite to another account, after clicking the registration link in the email invite, just enter your email address and the current password and click the "Link Accounts" option. An admin in the organization must restore the deleted user by following the steps below:
- Click the drop-down by your name/icon
- Click Manage Organization
- Click the Advanced Tab
- Click Deleted Users under Archives
- Click Undelete to the right of the user's name
- The restored account will utilize the same password that was set prior. Please use this link to Reset The Password if you need to.
- Reassign any items to the older profile that has been restored, as well as Adjust Which Weekly Meetings the restored account has access to, and edit the Org Chart as needed.
A user has not received an email invite
Users have to be sent invites in order to register their email and password for their user profile:
- Click the drop-down menu at the top right of the workspace by your name/icon (account admin only).
- Click Manage Organization.
- Click Members
- If a user has a checkmark next to their name, they are fully registered and will count towards the invoice.
- Users with an envelope next to their name will not count toward the invoice. There are 4 envelope statuses:
- Blue envelope - The user has been sent an invite but has not accepted.
- Gold envelope - The user has not been sent an invite.
- White envelope - The user is currently a placeholder and has not been sent an invite.
-
Red Envelope - When the envelope turns red, please verify the email address
- Click the envelope to populate a box where an email address can be entered and invites can be sent or resent or use the Send Invites button at the top right of the user list to send mass invites.
For additional information on user management, please see here: User Management - Add, Delete, and Restore.
User profile pictures are not populating
Only the photos of registered users (checkmark next to their name in the user list) will populate. Photos can be uploaded for all users, but until a user accepts their invite, the photo will not populate. If a user has any color envelope next to their name, they are not fully registered. For additional information on user/envelope status, please click here.
Important Photo Information
If your photo does not upload as expected, please try the following:
* Use a Chrome browser.
* Re-size the image to make it smaller and more square in shape.
* Email us at help@bloomgrowth.com with your picture and we'll upload it for you!
Can To-Dos Be Deleted?
To-dos cannot be deleted, but they can be archived. There are 2 options when it comes to archiving a To-do:
A To-do can be archived by running a live Weekly Meeting:
- Click Meetings in the top menu bar.
- Click Go to Meeting and run the meeting as you would normally.
- Click the To-do List agenda item on the left.
- If the To-do is not marked as done, click the checkbox, thus marking it complete. Otherwise, To-dos can be marked done from the workspace To-do tile.
- Click Conclude.
- Be sure the Archive Completed To-Dos is set to "Yes" which will archive all completed or check-marked To-dos as soon as you hit "Conclude or wrap-up"
- Click the Wrap-up/ Conclude option to conclude the Meeting.
A To-do can also be archived from outside of a meeting by switching it from a team or meeting To-do, to a personal To-do:
- Click the title of a To-do.
- In the To-do popup window, check the "Attach to Meeting(s)" dropdown box at the bottom left. If it lists a meeting name, click the dropdown and choose Personal To-do list.
- Click Save.
- Mark the To-do as Complete and it will drop off the list after 24 hours.
Please see Closing / Archiving / Deleting a To-Do
How do I reorder the measurables?
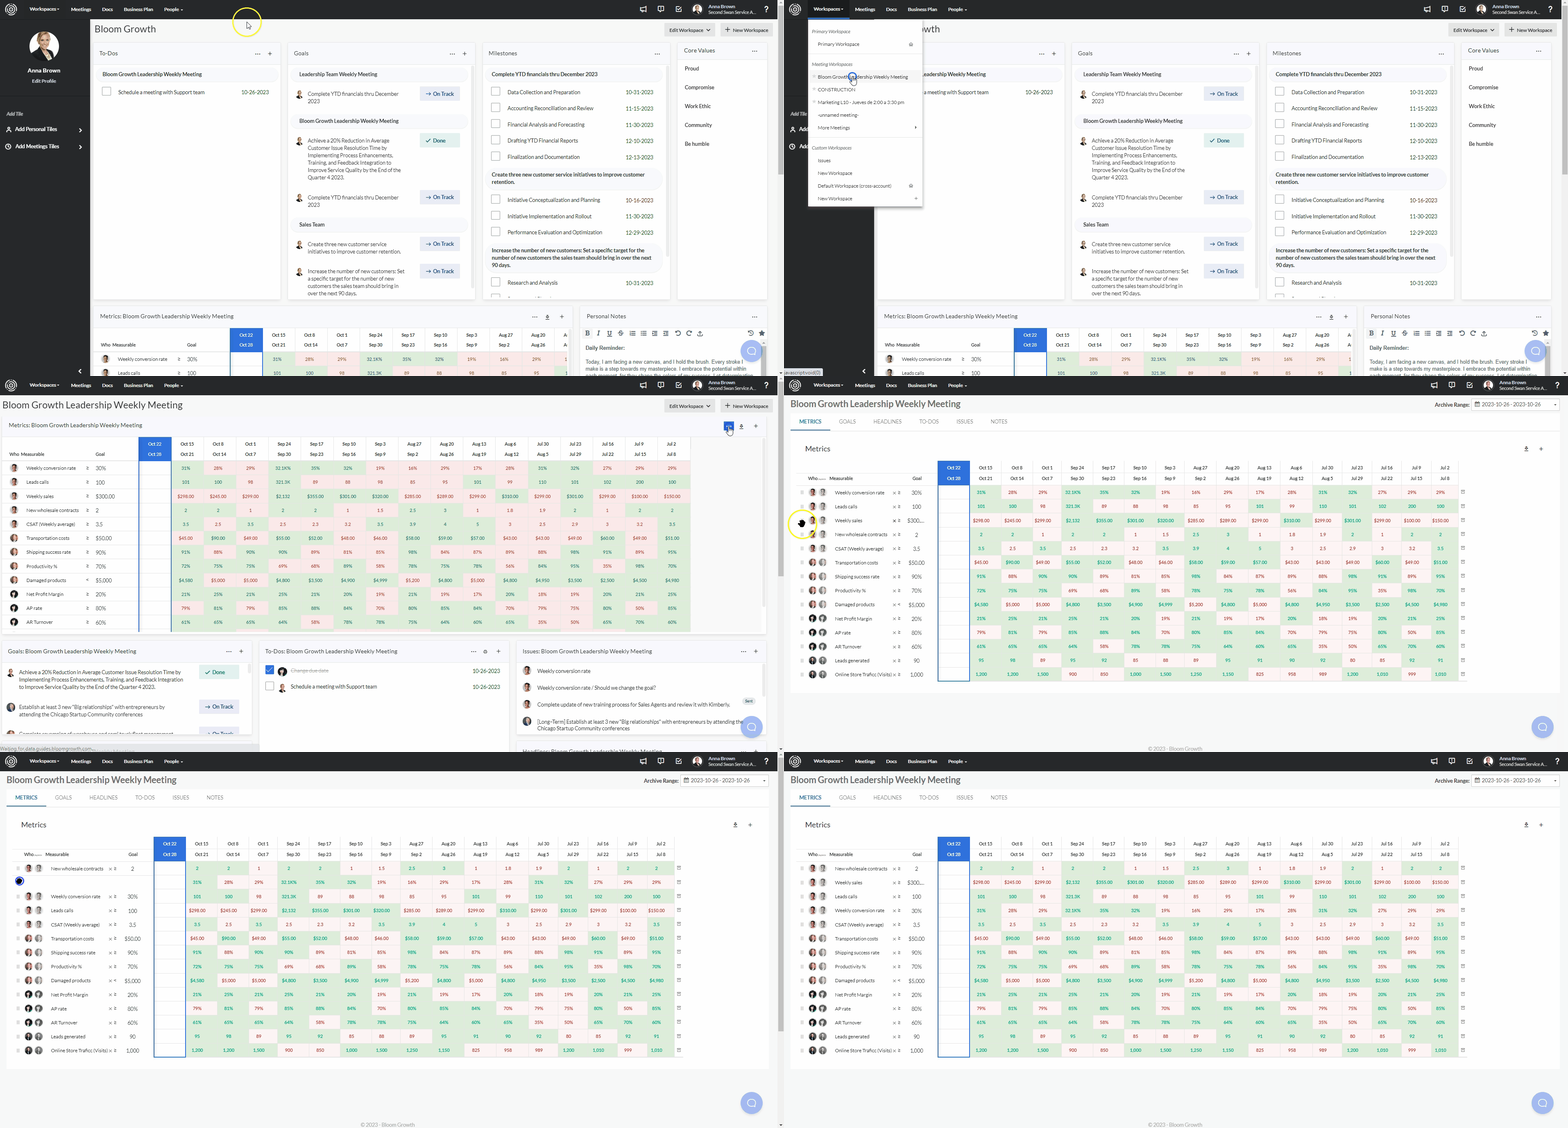
You can reorder the measurables from the Meeting Archive or from the Edit Meeting section: To reorder the measurables from the Meeting Archive, please follow these steps:
- Go to the meeting workspace you want to edit
- On the Metrics tile look for the three dots icon and click on View All
- The measurables will load, and you will see this icon at the left
- A hand icon may show up; once you see it click it and move the measurable up or down

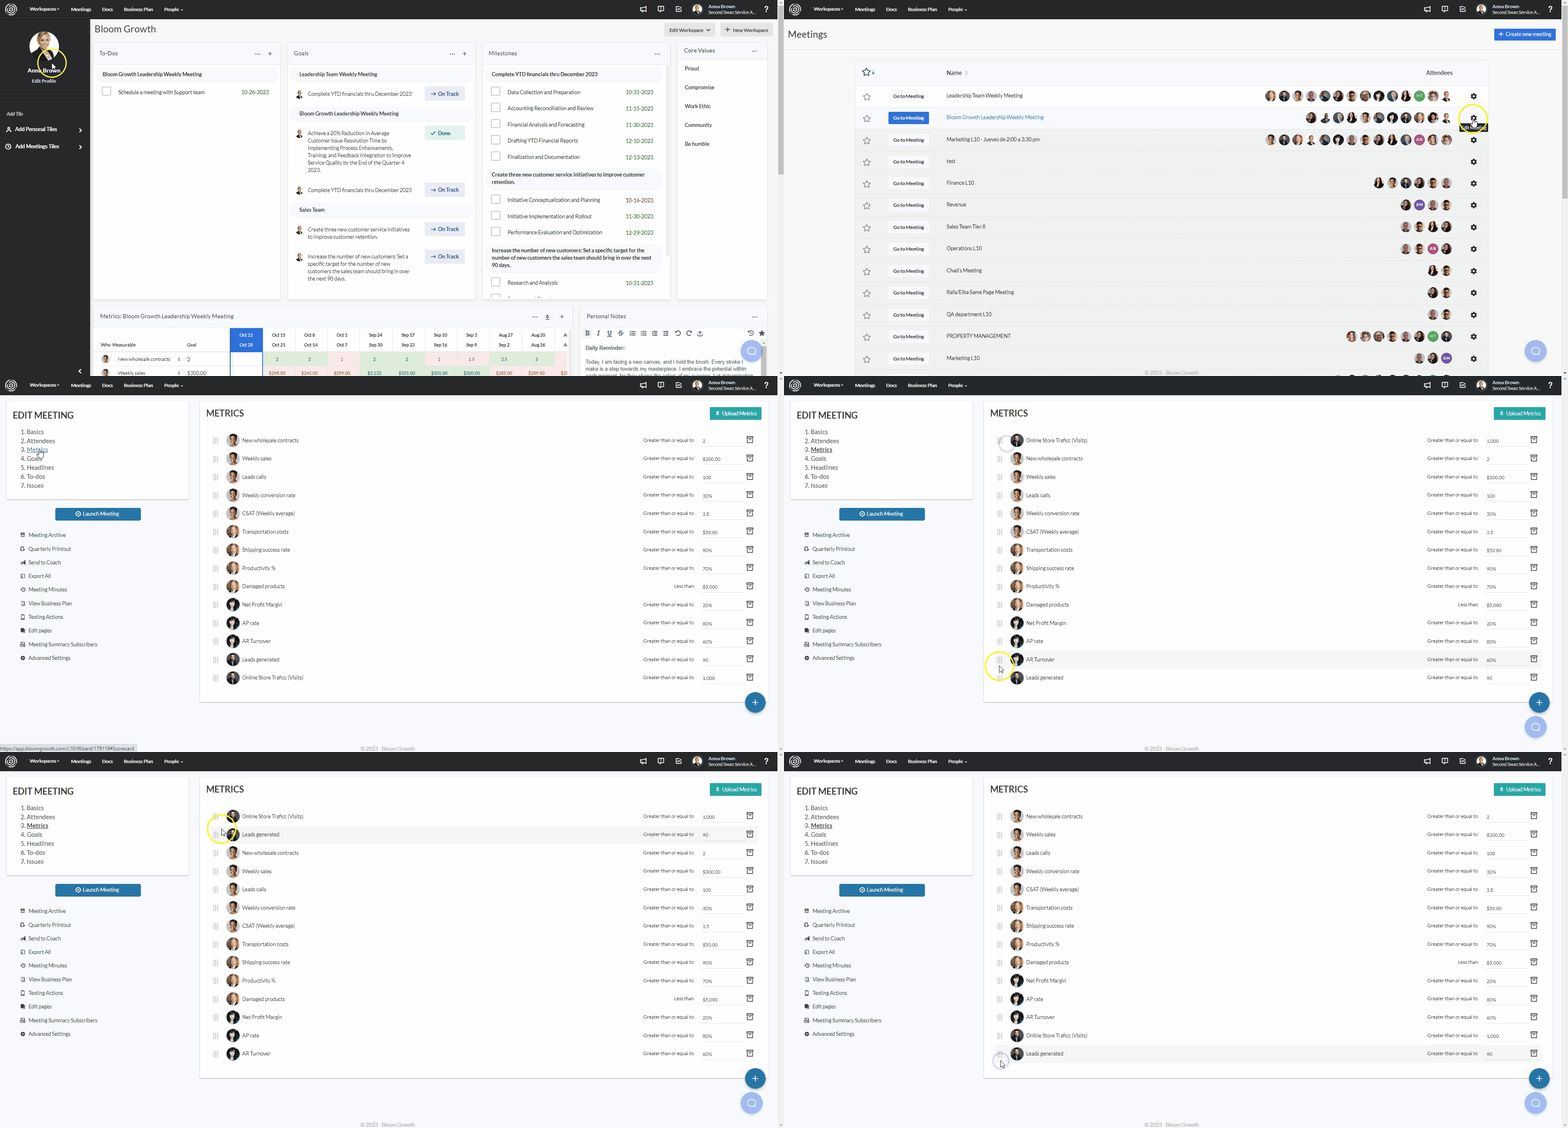
To reorder the measurables from the Edit Meeting section follow these steps:
- Click Meetings in the top menu bar.
- Click Edit Meeting on the gear icon button to the right of your meeting
- Click Metrics from the left side
- Rearrange the order of the measurables by clicking, dragging, and dropping the three vertical lines located on the left side to your preferred position.

I was added to a meeting but I don’t see it
When you’re added to a meeting, but do not see it on your Meetings dashboard, it might be related to the meeting permissions. Have the person who added you to the meeting (it can be a team member, supervisor, or admin) follow these steps:
- Go to Meetings
- Click Edit Meeting (gear icon located to the right of the meeting)
- Go to Basics (left side)
- Click the ‘Permissions’ tab (padlock icon located to the right of the page)
- Make sure that all Members have the view, edit, and admin permissions enabled
Important: Enabling those permissions will allow everyone to view the meeting, and edit goals, metrics, to-dos, etc. It is helpful that everyone in the meeting is able to edit their own accountabilities.
I am updating my password but it is not working
When updating your password, if nothing happens as you enter it, it might not meet the criteria for a strong password. Please ensure that your password::
- Minimum length of 12 characters
- Combination of uppercase and lowercase letters
- Inclusion of numbers
- The presence of at least one special character
By adhering to these guidelines, you can create a strong and secure password for your Bloom Growth account.
Where can I access Meeting Summaries from previous meetings in the Bloom Growth platform?
You can find the Meeting Summaries from past meetings in the "Meeting Minutes" and in the "Docs" section of your Bloom Growth account.
To access the Summaries from the Meeting Minutes follow these steps:
- Go to Meetings at the top Navigation bar
- Click the Edit Meeting option (gear icon to the right of the meeting)
- Click on Meeting Minutes (Left side)
- Look for the date
- Click on the three lines icon showing up at the right of the screen
To access the Summaries from the Docs section, please follow the steps below:
- Click Docs at the black banner on the top of your screen.
- Click the Bloom Growth Documents folder.
- Click the Meetings folder
- Click the meeting’s name folder. (If you have multiple meetings, you can use CTRL+F or CMD+F to search for the right one)
- Click on the Meeting Summaries folder.
- Click the summary you want to retrieve.
- The summary will open in a new tab. If you want to download or print it you can either right-click and select print, or you can use CTRL+P or CMD+P to get a PDF.
How do I add more columns to my Metrics?
To view additional columns in your Metrics, please follow these steps in the meeting archive:
- Go to the meeting workspace of the scorecard you want to see
- Click on the three dots at the top right corner of the scorecard tile and click on View All.
- Then select the date range you want from the top right of the screen
- Once it loads, scroll to the right to see previous dates.
I am getting an error on my tile or meeting
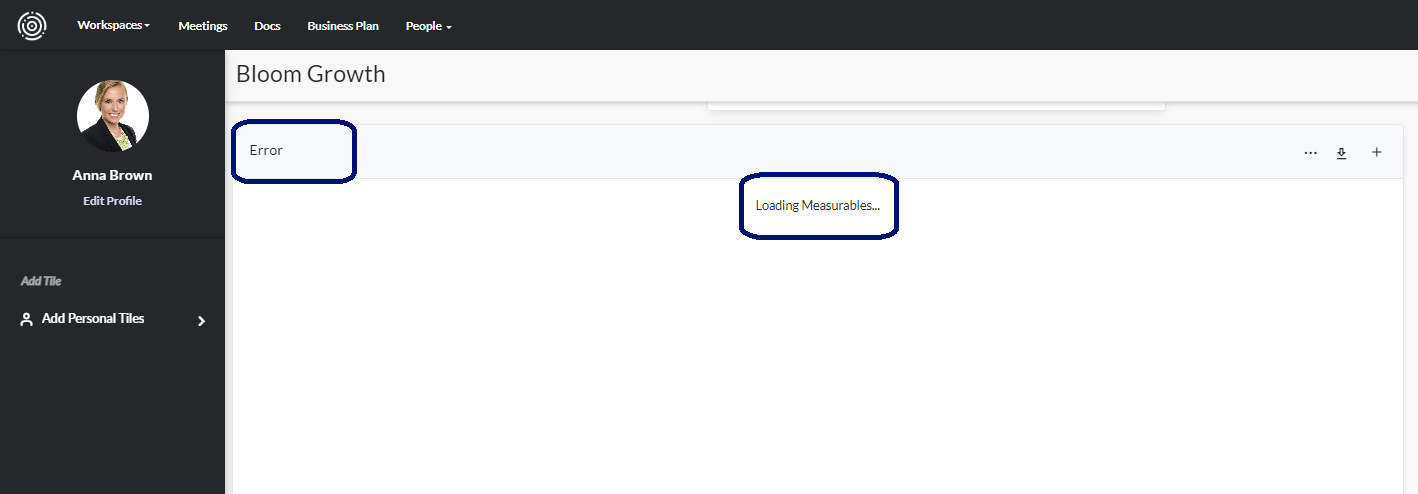
If you were previously included in a meeting but can't locate the meeting or encounter the screen shown below when accessing your Meetings dashboard, there are typically two possible explanations: the meeting might have been deleted, or you were removed from it. In such cases, it's advisable to get in touch with one of the administrators or the team member who initially added you to the meeting for clarification and assistance. When it comes to working with tiles, the situation might be a bit different. Even if you were removed from a meeting, any tiles that you added from that meeting to your personal workspace will remain. These tiles may still appear in your workspace and could look like this:
That would mean that the meeting has been deleted. You can click on the three dots to delete the tiles with errors and re-add them. Please see Workspace - Adding and Removing Tiles
Why can't I edit my goals from a meeting?
When you’re trying to edit or update your goals, but everything shows up greyed out, it might be related to permissions. Have an admin within the organization follow these steps:
- Go to Manage Organizations
- Click on Advanced
- Scroll down to Settings and enable these permissions:

4. Scroll down and click Save
You’re all set! You should now be able to edit your goals and milestones.
How can I change my Metrics Period?
The metrics period can be changed to weekly, monthly, or quarterly and this change can only be done by an admin. Here are the steps on how to change it:
- Click on your name at the top right of your screen
- Click on Manage Organization
- Click on Advanced
- Click the drop-down on Metrics Period
- Click Save
Please note that changing this setting will apply to all metrics across all your meetings. Currently, there isn't an option to customize the metrics periods for individual meetings.
Can I have more than one Business Plan in my Organization?
Having multiple Business Plans is possible, but it necessitates the creation of additional Leadership Team Meetings.
It's important to ensure that the Business Plan is not shared with other meetings, as doing so would override the second one you intend to create. This can be changed in the Advanced tab under the Manage Organization option. Please see the steps below:- Click your name at the top right-hand corner of your workspace.
- Click Manage organization
- Click Advanced
- In the "Share a Leadership Team Business Plan with all other departments" section ensure that the leadership team Business Plan is set to no meetings.
- Hit Save
Once is saved it, you can create another Weekly Meeting and start populating their data as normal.
To access individual Business Plans please follow the steps below:
- Click Meetings in the top menu bar.
- Click Edit Meeting on the gear icon button to the right of your meeting.
- Click View Business Plan on the left.
Important
There is only one set of core values per organization. Having different core values will require creating a different account.